At ValidExamDumps, we consistently monitor updates to the Talend Data-Integration-Developer exam questions by Talend. Whenever our team identifies changes in the exam questions,exam objectives, exam focus areas or in exam requirements, We immediately update our exam questions for both PDF and online practice exams. This commitment ensures our customers always have access to the most current and accurate questions. By preparing with these actual questions, our customers can successfully pass the Talend Data Integration Certified Developer Exam exam on their first attempt without needing additional materials or study guides.
Other certification materials providers often include outdated or removed questions by Talend in their Talend Data-Integration-Developer exam. These outdated questions lead to customers failing their Talend Data Integration Certified Developer Exam exam. In contrast, we ensure our questions bank includes only precise and up-to-date questions, guaranteeing their presence in your actual exam. Our main priority is your success in the Talend Data-Integration-Developer exam, not profiting from selling obsolete exam questions in PDF or Online Practice Test.
You want to use the value of a context variable you defined to configure a component, but you do not remember the exact name. You decide to use the auto-completion feature in Talend Studio Studio to get assistance.
Which keystrokes can you use to trigger auto-completion?
You created a Job to process a customer database. Next, you want to debug the Job using Traces Debug and pause the execution when it encounters any records for customers residing in the state of California.
To debug a job using Trace Debug mode and pause the execution when it encounters any records for customers residing in the state of California, you need to right-click on the trace on the output of the input component and select Show Breakpoint Setup option. Trace Debug mode is a feature that allows you to trace each row processed by your job components and see the values of each column in each row. You can access this mode by opening the Debug Run tab of the Run view and clicking on Trace Debug button. A trace is a link that shows the data flow between components in your job design workspace.
The Show Breakpoint Setup option allows you to set a breakpoint on a trace based on a condition or an expression. A breakpoint is a point where the execution of your job pauses and waits for your action. You can use breakpoints to inspect your data or debug your logic at specific points of your job execution. You can access this option by right-clicking on a trace on your job design workspace and selecting Show Breakpoint Setup. This will open a dialog box where you can enter a condition or an expression for your breakpoint.
For example, if you want to pause your job execution when it encounters any records for customers residing in the state of California, you can enter this condition for your breakpoint:
row1.state == ''CA''
This will make your job stop at the trace where this condition is met and show you the values of each column for that row.
Using the following input file format as an example:
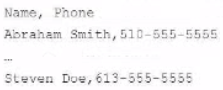
Which tFileinputDelimted component parameters should you configure to parse the input file correctly? Choose 3 answers
Using the following input file format as an example:
<OCR>Name, Phone Abraham Smith, 510-555-5555 ... Steven Doe, 613-555-5555 </OCR>
The tFileInputDelimited component parameters that you should configure to parse the input file correctly are Schema, Field separator, and Header. The Schema parameter defines the structure and type of the data in the input file. You can use a built-in schema or a repository schema to specify the columns and their properties. The Field separator parameter defines the character that separates each field in a row of data. In this case, it is a comma (,). The Header parameter defines the number of rows to be skipped at the beginning of the file. In this case, it is 1, as the first row contains the column names.
How do you create an empty Joblet?
To create an empty Joblet, you need to right-click on the Joblet Designs node in the Repository tree view and select Create Joblet option. This will open a dialog box where you can enter the name and description of your Joblet and select an icon for it. You can then design your Joblet by adding components and links to it in the Designer workspace.